|
The early A1 bodied cars come with
a smaller throttlebody then some Audi's and A2's. Replacing the
throttlebody with a larger unit without corresponding changes
to the intake & exhaust tracts will not have the improvement
you are really looking for. The larger throttlebody works very
very well with some intake work through a cam or headwork, or
exhaust work through a cam, headwork, header, or dual outlet
manifold and 2" exhaust. Throttle response is significantly
improved, and horsepower can be increased to levels that are very
easy to feel.
There have been several procedures
detailing converting an Audi 5000 (or a big bodied A2 tbody)
for use on the 8v Sciroccos. A few Scirocco mailing list members
have allowed the reposting of their procedures here. Please contact
them if there are any further questions.
The primary contributors to this article
are:
|
|
Tools & Items
you will most likely need:
- Get a TB from an Audi 5000. Probably any
80's- early 90's model will work.
- Allen wrench set
- Dremel tool
- Carbide burr and/or 1/4" ball end-mill
(carbide)
- Half round coarse metal file
- Various grits of sandpaper
- WD-40 Liquid Wrench or other similar spray-on
lubricant
- Carburater or equivalent parts cleaner
- Flat-tip screwdriver
- An assortment of vaccum line plugs
- A shop vacuum cleaner
- 11mm box-end wrench
- 7mm box-end wrench
- A new throttle body gasket for the Audi
5000 unit from a dealer (part # 037 133 073A)
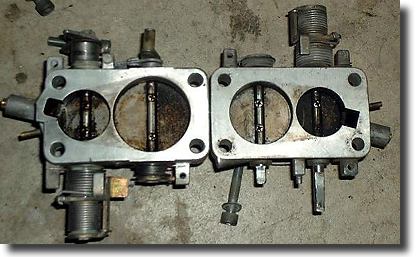
- Note the larger secondary plate
of Audi throttlebody on the left
- The intake manifold on an A1 is
not machined to accept the larger throttle body, however, it
can be ported to enable the use of the Audi throttle body. The
alternative to porting it is to use a VW or Audi Fox or an Audi
4000 intake. There are bonuses to either apporach and both procedures
are described below.
|
|
Step 1
 Remove
your old throttle-body from the car. Do this by loosening the
clamps holding the intermediate pipe to the throttle-body and
pulling it off. Then remove any vacuum lines connected to the
throttle body. There is probably only one in the back. Next,
remove the clip holding the throttle cable on the linkage. Remove
your old throttle-body from the car. Do this by loosening the
clamps holding the intermediate pipe to the throttle-body and
pulling it off. Then remove any vacuum lines connected to the
throttle body. There is probably only one in the back. Next,
remove the clip holding the throttle cable on the linkage.
- Using
a flat tip screwdriver, slide the clip towards the rear of the
car and it should ease off, allowing you to remove the throttle
cable from the unit. Now you should be clear to remove the four
allen bolts holding the unit to the manifold. Be careful to make
sure the allen wrench is fully seated in the bolts before you
loosen them. The heads on these bolts will strip out fairly easily
and you will be totally screwed if they do.
|
- Step 2
-
- Use the carburator / parts cleaner and
soak the new TB in it for a few hours.
|
- Step 3
In the picture
below you see the linkage has already been swapped to the new
unit.
 Now that you have the old unit out of the car,
you can compare it to the new Audi one. The throttle linkage
is different at the point where the cable connects to it. You're
going to have to remove the throttle cable attachment linkage
from the old one and attatch it to the new one. You have to do
this because the Audi accelerator cable pulls from a different
side. Now that you have the old unit out of the car,
you can compare it to the new Audi one. The throttle linkage
is different at the point where the cable connects to it. You're
going to have to remove the throttle cable attachment linkage
from the old one and attatch it to the new one. You have to do
this because the Audi accelerator cable pulls from a different
side.
- Using the
11 mm wrench, remove the nut holding the linkage on the primary
shaft and take the linkage off, taking care not to "sproing"
the springs. Do the same to the Audi unit and attatch your old
linkage to the new unit. You might have to adjust the full throttle
switch to make sure it clicks at the right time. *Important*
You also have to switch the idle adjuster because the Audi one
is just a screw and not a bolt so you will not have enough clearance
to adjust it. Use a 7mm wrench to adjust the idle after installation.
|
- Step 4
-
- You'll have to match port your intake
before installing the new throttlebody.
-
- Before
 Now
comes the fun part. You will have to port the intake manifold
to match the new throttle-body. First, stuff the manifold with
rags or paper towels so no chips or shavings go down the intake
tubes. The alternative is the remove the manifold from the engine,
which makes this job quite a bit easier. Make sure you count
how many rags go in, and remember to count them on the way out.
Kinda like a surgeon counting his instruments and gauze when
he's operating. Now
comes the fun part. You will have to port the intake manifold
to match the new throttle-body. First, stuff the manifold with
rags or paper towels so no chips or shavings go down the intake
tubes. The alternative is the remove the manifold from the engine,
which makes this job quite a bit easier. Make sure you count
how many rags go in, and remember to count them on the way out.
Kinda like a surgeon counting his instruments and gauze when
he's operating.
- After
you finish that, take a new Audi gasket and trace the outline
of the new bore on the manifold. This will be your guide for
cutting. There are several methods for removing the excess material.
A dremel type tool could be used exclusively, but you should buy at least 2 bits because they get
clogged with the aluminum.
Spend about 20 minutes on it with a coarse half-round file. It
will make short work of the soft metal and won't clog up so easily.
I then finish it off with the die grinder (or a dremel if you
don't have one) just to smooth things out. Aluminum clogs up
the bits really fast, by the way. *Important*
Note that you might not be able to
grind away everything on the small side of the intake because
you risk making a leak if you try to cut it too close.
Outlined
 Using the pattern or your traced
lines, grind out the material, being careful around the area
to the right hand side of the manifold (towards the rear of the
car). Be patient, take your time here,
do a good job. You
just want to blend this area to the new shape, the material is
very thin in this area. If you get too hoggish you'll grind right
through the side of the manifold. This is an experience you'll
surely dislike. The secondary area can be opened up without worrying
about breaking through. During the grinding process, use the
WD-40 or other lubricant to keep the carbide burr or file from
"loading up". Spray liberally and stop frequently to
keep the cutter lubricated. Take your time and you'll get good
results. Shown below is what the intake should look like when
you're done: Using the pattern or your traced
lines, grind out the material, being careful around the area
to the right hand side of the manifold (towards the rear of the
car). Be patient, take your time here,
do a good job. You
just want to blend this area to the new shape, the material is
very thin in this area. If you get too hoggish you'll grind right
through the side of the manifold. This is an experience you'll
surely dislike. The secondary area can be opened up without worrying
about breaking through. During the grinding process, use the
WD-40 or other lubricant to keep the carbide burr or file from
"loading up". Spray liberally and stop frequently to
keep the cutter lubricated. Take your time and you'll get good
results. Shown below is what the intake should look like when
you're done:
- After
 After you're done grinding out
the intake manifold, use the shop-vac to clean out all the shavings
and muck that you created. Make sure to get out as much as you
can. Whatever you leave behind will undoubtably be sucked into
the engine. Don't forget the rags too!! What was that count again? After you're done grinding out
the intake manifold, use the shop-vac to clean out all the shavings
and muck that you created. Make sure to get out as much as you
can. Whatever you leave behind will undoubtably be sucked into
the engine. Don't forget the rags too!! What was that count again?
|
|
Step 5
Now
install the new throttle-body. Installation is the reverse of
step 1. Plug off any vacuum lines you don't need to use on the
new throttle body.  There
may only be one unecessary line. After you tighten down the bolts
and hook up all the lines again, you'll need to adjust the throttle
cable. The Audi throttle-body's throttle linkage is further back
so it puts tension on the cable, opening the throttle. If you
don't loosen the cable a bit, you'll end up with a VERY high
idle. Trust me, you don't want your car idling at 4,000 rpm.
It's not really cool. There
may only be one unecessary line. After you tighten down the bolts
and hook up all the lines again, you'll need to adjust the throttle
cable. The Audi throttle-body's throttle linkage is further back
so it puts tension on the cable, opening the throttle. If you
don't loosen the cable a bit, you'll end up with a VERY high
idle. Trust me, you don't want your car idling at 4,000 rpm.
It's not really cool.
|


