Scirocco Rear Windshield Wiper Motor Repair
Overview:
It seems that the rear wiper motors on these cars often stop working, so I figured there must be something wrong with the design that might could be fixed. Sure enough there is, and itís a really easy fix. Here are a few things to know up front:
1) If your wiper doesn't move, and you leave it on, it will eventually burn up the motor. This procedure will not help you at that point. If, unlike the previous owner of my car, you stopped trying to use it when it stopped working, then you are probably OK. This procedure fixes the mechanism, not a charred motor.
2) Donít take the motor off of the assembly. If the motor is bad, you canít fix it. If the motor is good, you will only cause yourself undo grief trying to get the motor back together after you have removed it. The motor tends to come apart instead of coming out of the assembly.
3) Donít undo the wiring to the assembly. This procedure should take about 10 minutes, and wouldnít be appreciably easier with the wires disconnected. Your options are to undo the soldered joints or unplug the wiring harness in the hatch, which is only bad because it will take you longer to get the wires threaded back up into the hatch than it will take you to actually fix the thing where it is (dangling in mid air by its wires).
4) Donít come crying to me if you screw up. There are wires on the outside of the motor assemblyís casing that have 12V running to them even when the wiper motor is turned off. Donít shock yourself with them. Donít short them out and blow a fuse. DO turn the ignition off, and I guess Iíll say it, you are supposed to unplug the battery before doing anything on any car anyway. Use this article and its information at your own risk. There is a possibility of hurting yourself, your car, car parts, your neighborís dog, and blowing up the Eastern sea board by listening to anything I say. If and only if you are OK with that, you may proceed.
Troubleshooting:
The first thing you have to do is make sure you have the right problem, so youíll know if this is the right solution:
1) With the ignition on, but the engine not running, push the right steering wheel stalk forward briefly. This should start the wiper motorís intermittent operation. There is a relay under the dash that should click twice every 3-5 seconds (approximately). IF YOU HEAR THE CLICKING, TURN OFF THE WIPER! Leaving it on will burn up the motor. Turn the wiper (relay) off by pushing the stalk forward once more.
If you donít hear the relay click when the motor is switched on, then either the fuse is blown (15 amp fuse #11 in my car), or the relay is bad (relay #11, the next-to-last one (one space away from the turn signal relay) in my car). You could also have no power to the fuse or the relay, but that is less likely if the only thing not working is your wiper. Holding the stalk down is supposed to turn on the rear window sprayer and move the wiper a few times, incidentally.
2) If you heard the clicking, then follow the instructions below to remove the wiper motor assembly and check to see that either the motor gets hot when it is turned on (donít try this too long, it gets REALLY hot REALLY fast. And donít burn yourself, either), or that there is voltage being supplied to the wires that are soldered to the housing. The terminal on the right should have 12V going to it whenever the ignition is on. The terminal on the left should only receive voltage when the relay clicks, but it may always have voltage depending on the position of the insides of your motor assembly.
Tools:
Tools needed to get the motor out of the hatch:
10mm and 22mm wrenches or sockets
Large Phillips screwdriver
Something with which to remove a small circlip/snap ring
Small regular screwdriver for removing wiper arm cap
Tools needed to actually fix the mechanism:
Small nail or drift (at least æî long)
Drill bit large enough to fit the nail through the hole it makes
Drill
Some sort of glue (superglue, elmerís, or whatever. Thereís probably some trademarks there somewhere. RTV is probably too thick)
Other Stuff:
Brain (optional)
RTV or other sealant to plug up the tiny hole you are about to make (optional too, I guess)
Procedure:
First thing to do it get the motor assembly out of the hatch. As mentioned before Iíll advise leaving it plugged in just to save trouble. If you already have the motor unbolted from the hatch, click here.
Step 1: Remove the Wiper arm
1. Remove the small plastic cap covering the wiper armís bolt.
2. Next in line is a 10mm nut
3. Öand a washer.
4. Pull the wiper arm off of its shaft.
5. Remove the 22mm nut
6. Ö and another washer.
 Step 2: Unbolt the Motor
From its Mounts
Step 2: Unbolt the Motor
From its Mounts
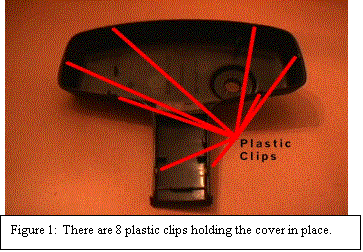
1. From inside the hatch, remove the lower plastic cover covering the wiper motor assembly. This thing just clips into place, and you will likely break one or two of its clips. Figure 1 shows the upper cover, and the locations of the clips you are trying not to break. Mine actually came off without anything breaking.
2. Use a 10mm socket or wrench to unbolt the bracket supporting the motor assembly , and a Phillips screwdriver to unbolt the bracket from the hatch. The motor assembly should now be loose.
3. Fix the thingÖ
Step 3:
Understand whatís going on inside (optional)
Well,
maybe this should have been step 1, but itís too late for that now. Figure 2 shows the 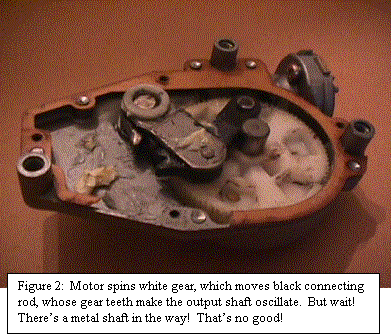 guts
of the rear wiper motor mechanism.
guts
of the rear wiper motor mechanism.
The only way to get the cover off of the mechanism is to drill out the rivets, so you probably will not want to do that. I had also removed the motor from the assembly, which you will not want to do because you donít need to and itís a pain to get it back together.
The
big, white, plastic gear is driven by the motor. The problem with the whole assembly is that the shaft this gear
spins on doesn't stay in itís place. It
is apparently designed to be press fit into the aluminum housing, but the fit
isnít very good. Since this shaft isnít
held firmly in place, it falls downward until it reaches the position shown in
Figure 2. In this position it blocks
the connecting rod, which keeps the gear from spinning. All that needs to be done is to push this
shaft back into place and convince it to stay there. To do so, we will drill a small hole in  the
sheet metal plate that covers all of this and use a nail, or something similar
to push the shaft back in place.
Applying some superglue or other adhesive to the back of the shaft
should be enough to keep it from falling into harms way again. This can be done through a pre-existing hole
in the aluminum housing (in the side these pictures donít show). Figure 3 gives an insiderís view of how the
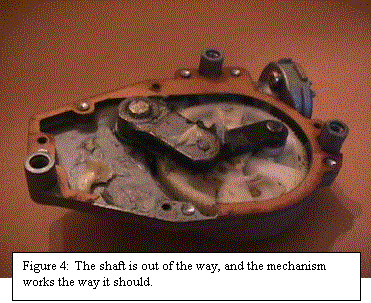
nail will put that shaft in its place, and Figure 4 shows the connecting rod
passing over the shaft just like it always wanted to do.
the
sheet metal plate that covers all of this and use a nail, or something similar
to push the shaft back in place.
Applying some superglue or other adhesive to the back of the shaft
should be enough to keep it from falling into harms way again. This can be done through a pre-existing hole
in the aluminum housing (in the side these pictures donít show). Figure 3 gives an insiderís view of how the
nail will put that shaft in its place, and Figure 4 shows the connecting rod
passing over the shaft just like it always wanted to do.
Step 4:
Do it yourself
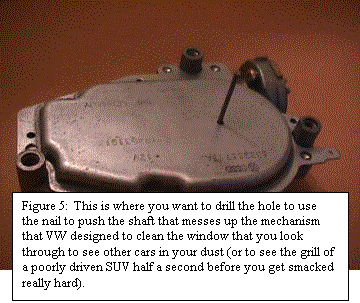
Since you are not going to take the cover off of the motor assembly, all you will see is a steel plate. Your job is to make a hole in this plate so you can stick the nail through it and push the shaft back into place.
1. Locate, as best you can, the place to drill the hole, and drill it. You are aiming for the center of the ~2 ‡î curve in the steel plate. Figure 5 should be worth somewhat less than 1000 words.
2. Flip the assembly over and put a few drops of whatever glue you have in the small hole that is already present in the aluminum side of the housing. This is our attempt to prevent this problem from recurring, and it may not work, but itís about the best we can do. I think it should work, though.
3. Flip the assembly back over, and put the nail into the hole you drilled. Press the shaft back into place. The shaft shouldnít give too much resistance (thatís what got us into this mess in the first place), so light tapping with a hammer is the most that should be required if you canít do it by hand. If the nail sinks just shy of ‡ of an inch into the hole, you are done. Oh, did I mention that most of the glue you put in the opposite side just squirted out? Donít let it mess up your interior!
 Step
5: Installation is the reverse of
removal
Step
5: Installation is the reverse of
removal
I always wanted to say that. Turn the wiper motor on (by pressing the right steering wheel stalk forward briefly), and see what happens. If the output shaft turns you are in good shape. If the shaft doesn't move and the motor heats up, you probably just wasted a little time, but at least you tried and maybe learned something.
The only thing you need to know is that, when putting the wiper arm back on, the tip of the arm should be 30mm (1.18î) from the left hand edge of the window. You HAVE to turn the motor on once to make sure it is in its initial position before putting the arm back on. This distance probably varies for some cars so check a Bentley service manual for your car if it isnít a Scirocco II. I think Cabrios and Jettas use a different distanceJ. I hope this article was helpful. If so, send small-unmarked bills toÖ
Let me or the appropriate webmaster know if you have anything to add to this. May you see many rice rockets behind you through your cleanly wiped rear window.
Sincerely;
1987 Scirocco 16v
